Installation & Hello World
Welcome to this step by step guide that shows how to install and use XplainDB and XplainUX. Let’s create a simple “Hello World” application using XplainDB to fetch data and XplainUX to visualize these data. Assuming you are using Linux, use this:
go to your working directory:
cd /my/working/dir
create the directly that will hold your application:
mkdir myAppName
create the sencha workspace and application:
sencha generate workspace .
sencha -sdk /path/to/your/extsdk/ generate app -classic myAppName .
create the UX package:
sencha generate package xplain-ux
copy an already existing xplain-ux instance (alternatively, you may want to download a new instance via GIT):
cp -a /path/to/packages/local/xplain-ux/ packages/local/xplain-ux/
Open app.json file:
nano app.json
Find the text “requires” in this file. The “requires” section should look like this::
"requires": [
    "font-awesome",
    "xplain-ux"
],
adopt this section so it looks like this:
"requires": [
    "font-awesome",
    "charts",
    "xplain-ux"
],
install your copy of of XplainDB:
mkdir xplain
copy an already existing xplain-db instance (alternatively, you may want to download a new instance via GIT):
cp -a ../path/to/xplain/ xplain/
edit you index.html file and insert the following below <title>helloxplain</title>:
<!-- ###################### Load jQuery and XplainDB ################### -->
<script src="http://code.jquery.com/jquery-3.2.1.min.js" integrity="sha256-hwg4gsxgFZhOsEEamdOYGBf13FyQuiTwlAQgxVSNgt4=" crossorigin="anonymous"></script>
<script type="text/javascript" src="xplain/db/xplaindb.js"></script>
<!– load localisation content for XplainUX –> <script src=”resources/xplainuxI18N.js”></script>
start your application:
sencha app watch
The output of this script should contain something like Application available at http://localhost:YOURPORT:
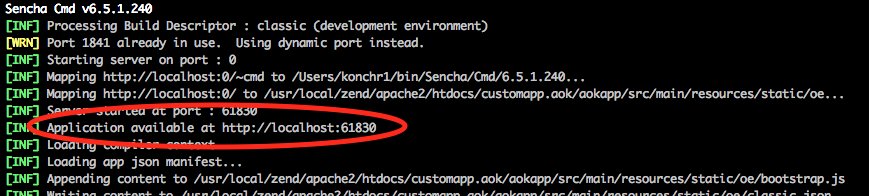
Write down this URI, open your browser and go to this URI. Your application should pop up.
Implement your application
Now, let’s start to implement your “Hello Xplain” application. Open app/view/main/Main.js. Try to find following lines:
items: [{
    title: 'Home',
    iconCls: 'fa-home',
    // The following grid shares a store with the classic version's grid as well!
    items: [{
        xtype: 'mainlist'
right below these lines, enter the following:
},{
        xtype: 'button',
        handler: function() {
                // setup default configs
                Xplain.Db.Configuration.setDefaults({
                    timeout: 0,
                    async: true,
                    url: 'http://localhost:8080/',      // replace this with you host
                    cors: true,
                    error: function(d) {
                        alert('oops... something went wrong - see console for more details');
                        console.warn(d);
                    }
                });

                // perform the login
                xplainSample = new Xplain.Db.Connection();
                xplainSample.connect({
                    user:"user",
                    password:"password",
                    configuration:"Startup Configuration.xstartup",
                    success: function(d) {
                        // create a simple query
                        var q = new Xplain.Db.Query({
                                    target: 'Patient.Geschlecht.Geschlecht'
                            });

                        // open that query...
                        q.open({
                            success: function() {
                                // ...and depict query results
                                var win = Ext.create('xplain.ux.attribute.Window', {
                                    forQuery: q,
                                    winTitle: 'Meine Query',
                                    x: 100,
                                    y: 100,
                                    parentComponent : 'winContainer'
                                });
                            }
                        });
                    }
                });
        },
        text: 'Xplain'
    },{
        xtype: 'panel',
        height: 600,
        id: 'winContainer'
    }]
Register XplainUX as default Ajax handler
Open your Application.js file and locate the launch method. Add the following line at the beginning of this method:
xplain.ux.Data.registerAjaxDefaultHandler(this);
If there is no launch method in your Application.js create one that looks like this:
launch: function () {
    xplain.ux.Data.registerAjaxDefaultHandler(this);
}
Furthermore, make sure that the necessary file is in the requires section:
requires: [
    'A.Class.From.Your.App',
    'Another.Class.From.Your.App',
    'xplain.ux.utils.Tools',
    'xplain.ux.Data'
],
Add your localisation files
XplainUX comes with localisations for English and German. Copy the xplainuxI18N.js file into the resources folder of your Sencha project.
In order to activate the localisations, put something like following lines into your Application.js (at the 1st line):
if (localStorage.getItem('prefered_lang') == undefined || localStorage.getItem('prefered_lang') == 'en') {
    Ext.create('YourProject.locale.en');
} else {
    Ext.create('YourProject.locale.de');
}
Make sure to replace YourProject with the name of your project.